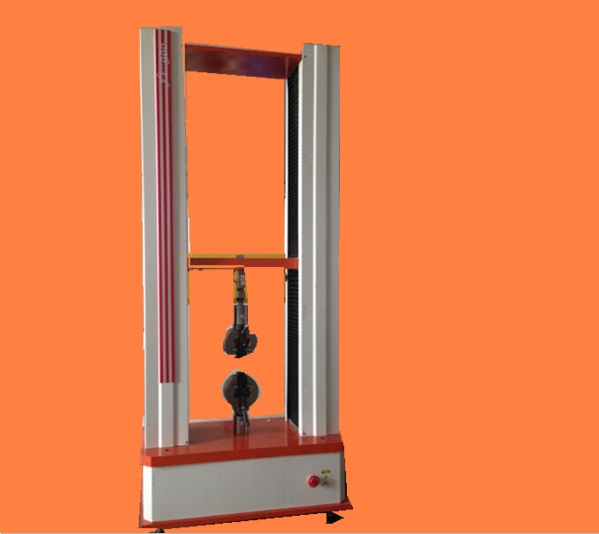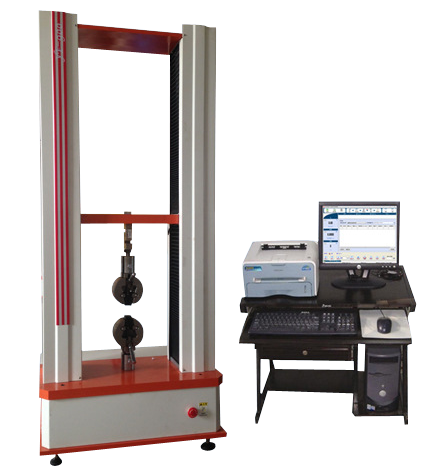
5KN电子拉力弯曲压缩强度试验机 Experimental steps
1. Tensile test
5KN电子拉力弯曲压缩强度试验机 One is to select the measuring range based on the sample, hang and align it with the engraved line, and adjust the buffer valve to match the measuring range. The second is to turn on the power, start the oil pump, and open the oil delivery valve to make the piston rise and fall 200mm, 2-3 times. The third step is to raise the piston by 20mm to 40mm and align the pointer with the zero position. Fourthly, adjust the moving crossbeam to the appropriate position. Close the oil delivery valve, press the "open" and "clamp" buttons on the clamp, clamp the sample, and be sure to keep the sample in a vertical position and in the middle. Adjust the indicator disk speed according to the loading speed required by the experiment. The fifth step is to open the oil delivery valve and start loading, so that the rotation speed of the pointer is basically consistent with the speed of the tracking disc. After the sample is damaged, close the oil delivery valve, record the test data, return the passive needle to zero position, and remove the fractured sample. Seven is to repeat the content from two to six and continue with the next experiment.
2. Compression test
One is to select the range based on the test block, hang and align it with the engraved line, and adjust the buffer valve to match the range. The second is to connect the power supply, start the oil pump, open the oil delivery valve to make the piston rise a section, adjust the pointer to zero, and close the oil delivery valve. Thirdly, activate the loading speed indicator and adjust the indicator disk to rotate at a certain speed according to the loading speed. Fourthly, place the test block properly. The fifth step is to quickly adjust the oil delivery valve to the corresponding position, keeping the pointer and indicator plate rotating synchronously until the test block is crushed. Close the oil delivery valve and open the oil return valve. The sixth step is to record the test data and retract the driven needle. Seven is to remove the crushed test block. Repeat the content from four to eight until all test blocks are completed.
Technical parameters:
A. Test force (kN): 5kN
B. Measurement accuracy of testing machine: Level 1 (standard version)
C. Effective force range: 2% -100% FS/
D. Resolution: 1/300000
E. Relative error of indication: ? 1%
F. Speed adjustment range: 0.05-500mm/min (stepless speed regulation)
G. Accuracy: better than ? 1% of the indicated value
H. Force control rate control range: 0.05-5% FN
I. Measurement range: 0-999mm
J. Resolution: 0.001mm
K. Measurement accuracy: better than ? 1% of the indicated value
L. Power supply, power:~220V ? 10% 50Hz 0.5kW
M. Weight (kg): 120KG
N. Usage conditions: Temperature: 10 ? C to 35 ? C; Humidity: 30% -85%;
software documentation
a. Software system: software packages in both Chinese and English for Windows 2000/XP/Win7 platforms
b. Automatic storage: Test conditions, test results, calculation parameters, and gauge position are automatically stored.
c. Automatic return: After the experiment is completed, the crossbeam of the testing machine will automatically return to the initial position of the experiment.
d. Continuous test: After setting a batch of test parameters, continuous testing can be conducted.
e. Multiple curves: Multiple different curves can be displayed on the same graph, including load displacement, load time, displacement time, stress-strain, load two-point extension, and more.
f. Curve comparison: The curves of the same group of samples can be overlaid and compared on the same graph.
g. Report editing: Different report formats can be output according to user requirements.
h. Dynamic display: During the testing process, the load, elongation, displacement, and selected test curves are dynamically displayed in real-time on the main control screen as the test progresses.
i. Automatic scaling: In the experiment, if the coordinates of the load, elongation, and other curves are not selected properly, the coordinates can be automatically changed according to the size of the measured values. Ensure that the curve is displayed in a large format on the screen under all circumstances.
j. Peak holding: Throughout the entire testing process, the maximum drunk value of the test item is displayed on the screen window as the experiment progresses.
k. Execution standards: Meet various testing methods and standards such as GB, ISO, JIS, ASTM, DIN, etc.
试验步骤
1.拉伸试验
一是根据试样选用量程,挂好 并对准刻线,并调整缓冲阀使之与量程范围相适应。二是打开电源,启动油泵,开启送油阀让活塞上升下降200mm,2次~3次。三是让活塞上升20mm~40mm,调指针对准零位。四是调整移动横梁至适当位置。关闭送油阀,按动夹头“开”、“夹紧”按钮,夹紧试样,必须注意使试样处于铅垂并位于中间位置。按试验要求的加荷速度调整指示盘转速。五是打开送油阀开始加荷,使指针的旋转速度与跟踪盘的速度基本保持一致。六是试样破坏后,关闭送油阀,记录试验数据,将被动针拨回零位,取下断裂的试样。七是重复二到六的内容继续下一试验。
2.抗压试验
一是根据试块选用量程,挂好 并对准刻线,并调整缓冲阀使之与量程范围相适应。二是接通电源,启动油泵,打开送油阀使活塞上升一段,调指针对零,关闭送油阀。三是启动加载速度指示器,根据加载速度,调整指示盘以一定的转速旋转。四是放好试块。五是迅速将送油阀调到相应位置,应保持指针与指示盘同步旋转,直至试块压碎,关闭送油阀,打开回油阀。六是记录试验数据,拨回从动针。七是清除被压碎试块。八是重复四到八的内容直至所有试块做完。
测试项目:(普通显示值及计算值)
★拉伸应力 ★拉伸强度
★扯断强度 ★扯断伸长率
★定伸应力 ★定应力伸长率
★定应力力值 ★撕裂强度
★任意点力值 ★任意点伸长率
★抽出力 ★粘合力及取峰值计算值
试验机仪表:
本仪表采用国际比较先进的放大器,A/D、微处理器、高性能高清晰的液晶显示屏构成,整个系统采用类似手机PDA键盘,光标导航,全中文显示,浮点数数据处理,结构简单操作方便,自动计算存储,适合于企业,质检单位材料力学性能检测仪表。
注意事项:
1初次开机前,请检查各种连线的准确性以及输入电源的正确性,电源一定为交流220V交流电源,接地良好。
2试验前,请正确设置试验参数,以保证试验数据的准确性。
结构特征及工作原理
本机由机械、电气二大部分组成(见附图)。
1机械部分结构及工作原理:
本机采用电动加载方式,底部是整机结构承载支架,内部包含有电机驱动器、加载电机、减速机构、动力传动机构等部件;上部是试样夹持及力值、位移测量机构,包含有试样拉伸夹具、测力传感器、位移传感器等主要部件。
2 电气部分:
电气部分由显示测量控制部分组成。显示测量控制部分实现各种控制、显示、数据采集、处理等功能。软件部分的操作请仔细阅读《软件说明书》。
3 本机的几项主要功能:
3.1 全开放性参数设置
3.2 设置参数保存
3.3 浮动零点设置,可随时调整零点
3.4 峰值保持及存储,常值跟随;
3.5 在有效速度范围内,速度值任意设置;
3.6 横梁移动过程中的速度快捷切换功能
3.7 灵活的数据查询显示功能;
3.8 过载停机保护功能;
3.9 试验结束自动判断功能;
3.10 极限位置保护等;
开关机注意事项:
1开机时主机和计算机的开机顺序会影响计算机的通讯初始化设置,所以务必请用户严格按照上述开机顺序进行。
2每次开机后要预热5分钟,待系统稳定后,才可进行试验工作。
3如果刚刚开机,需要再开机,至少保证1分钟的间隔时间。
4在更换夹具后,首先要注意调整好可调挡圈(上下限位开关)。
5尤其在用小力值传感器做试验时,一定要调整好可调挡圈的位置,以免操作失误而损坏小力值传感器。不要超过传感器的额定量程。
6任何时候都不能带电插拨电源线,否则很容易损坏电气控制部分。
7试验过程中,不能远离试验机。
8试验过程中,除停止按键和急停开关外,不要按控制盒上的其它按键,否则会影响试验。
9试验结束后,一定要关闭所有电源。
10本计算机是专门用于试验机控制和数据处理的,请勿在计算机内安装其它应用软件,以免试验机应用软件不能正常运行。
11计算机要严格按照系统要求一步一步退出,正常关机,否则会损坏部分程序,导致软件无法正常使用。
12不要使用来历不明或与本机无关的软盘在试验机控制用计算机上写盘或读盘,以免病毒感染。
6.1 检验用器具
检验试验机用的标准仪器、量具和检具如下:
a) 符合GB/T 13634—2000第7章规定的标准测力仪或力的测量准确到?0.1%以内的专用检验砝码;
b) 最大允许测量误差为?2%的同轴度自动测试仪(或准确度与其相当的其他测量装置)或重锤;
c) 表面粗糙度测试仪;
d) 洛氏硬度计;
e) 分辨力为1/100s的秒表;
f) (0~30)mm量程的1级百分表、(0~1)mm量程的1级千分表和磁力表座,1 000mm量程最大允许误差为0.2mm的钢直尺;
g) 0.02mm/m的水平仪;
h) 2级声级计;
i) 符合JB 6146-2007中6.2.1规定的引伸计标定器;
j) 绝缘电阻测试仪;
k) 耐电压测试仪;
l) 通用量具;
m) 钢制或铜与铝制的同轴度检验试样(标距不小于100mm,标距部分直径通常为10mm或12mm,标距部分与两头部的同轴度为φ0.02mm);
n) 各种试样(试样的数量应与拉力钳口的套数相同,试样的截面尺寸应适合各种圆试样和板试样的拉力钳口)。
试验机应有铭牌,其内容包括:
a) 名称;
b) 型号;
c) 试验机最大容量;
d) 试验机级别;
e) 出厂日期、编号;
f) 制造厂名称或标志。
校准
校准是调整精度的关键部分,试验机的准确度关键步骤,具有自动校准,输入数据后一键完成功能,当挂上砝码,目标值输入你要矫正值后按确定键,仪表自动将数值校正。
进入校准界面,按‘标定’键,进入密码输入界面显示
‘密码:000000’输入系统默认密码123456进入校准界面,进入后界面显示当前力值,峰值、位移、目标值、速度。在系统校准模式下速度是利用导航键进行调整(0.1-50mm/min)用此速度进行压测力计操作。
备注:设备在出厂时已经校准完毕,可以直接进行试验操作。
北广产品销往北京、上海、广东、河南、浙江、河北、江苏、湖南、内蒙、山东、四川、广州、江西、西北、云南、深圳、吉林、南京、嘉兴、佛山、苏州、杭州、西安、潥阳、长春、江苏、平顶山、安徽、金水、金华、海南、廊坊、天津、成都、扬州、东莞、济南、南通、株洲、保定、贵州、宜兴、嘉兴、黑龙江、漳州、成都、重庆、咸阳、济南、绍兴、杭州、拉萨、山西、惠州、沧州、江西、沈阳、武汉、沈阳、昆明、鹤山、许昌、青海、宁波、醴陵、淄博、瑞安、阜新、合肥、长沙、常州、瑞安、青岛、无锡、济宁、醴陵、厦门、河源、乐清、烟台、福州、龙口、徐州、唐山等地销售。
产品保修承诺:
1、免费送货到用户指定的地点,免费指导安装、培训及调试。
2、保修期内人为损坏的零部件按采购(加工)价格收费更换。
3、保修期外继续为用户提供优质技术服务,在接到用户维修邀请后3天内派工程师到达用户现场进行维修。并享有优惠购买零配件的待遇。
4、传感器过载及整机电路超压损坏不在保修范围内。
5、产品质保期:自安装正常使用日起一年;
6、软件升级:终生免费提供新版本控制软件。
业务咨询:932174181 媒体合作:2279387437 24小时服务热线:15136468001 盘古机械网 - 全面、科学的机械行业免费发布信息网站 Copyright 2017 PGJXO.COM 豫ICP备12019803号